What is Smoke Testing?
Testing basic or critical features of an application or system before doing thorough testing is called Smoke testing. It involves executing a set of high-level test cases to quickly identify key issues.
In this tutorial, we will explore the concept of smoke testing, its benefits, and how to do it effectively. We will also provide examples to clarify the process.
Advantages of Smoke Testing:
- Early problem detection: By performing smoke testing early in the test cycle, critical defects can be identified and addressed immediately, reducing the risk of missing major issues.
- Time and Effort Efficiency: Smoke testing helps in saving time and effort by quickly determining the stability of construction. This prevents the waste of resources on thorough testing if the build is fundamentally flawed.
- Risk Mitigation: Detection of critical defects at an early stage reduces the risk of delivering defective products to end users, thereby ensuring a high level of quality and customer satisfaction.
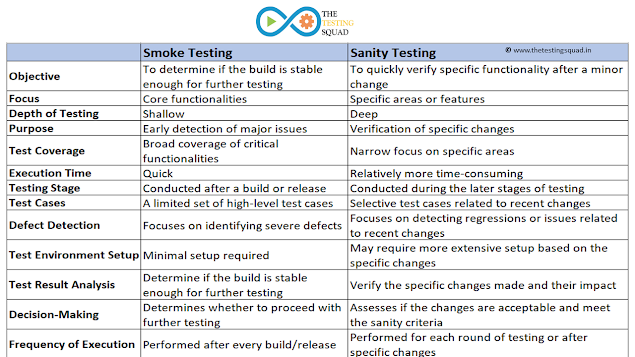
Difference Between Smoke Testing and Sanity Testing?
Smoke Test Procedure:
Step 1: Define Scope:
- Identify the critical functionalities and key features of the application or system that require verification.
- Determine the primary areas that will be covered in the smoke test. Focus on the most important and frequently used features.
Step 2: Develop a test plan:
- Create a concise test plan that outlines the objectives, test cases, and test data to be used in the smoke test.
- Specify the hardware, software, and environment configuration required for testing.
Step 3: Set up the test environment:
Prepare the test environment, including installation of required software, configuration of the network, and provision of any required test data or databases.
Step 4: Install Build:
Install the latest build or release that requires smoke testing. This should be a stable build, preferably a release candidate.
Step 5: Execute smoke test cases:
- Develop a set of predefined test cases that cover the critical functionalities and core workflows of the application or system.
- Execute test cases to verify basic operation and determine whether the build is minimally functional.
Step 6: Analyze test results:
- Analyze test results to assess the success or failure of the smoke test.
- If critical functionality fails, this indicates a serious problem that requires immediate attention.
Step 7: Reporting and Decision Making:
- Prepare a comprehensive report summarizing the smoke test results, including any defects or problems identified.
- Based on the results, stakeholders can make informed decisions regarding the stability of the formulation and the need for further testing.
Examples of smoke test scenarios:
Web Applications:
- Verify that the login/authentication process is working correctly.
- Access the main pages and make sure they load without errors.
- Submit a form and validate successful data submission.
- Perform basic navigation and confirm smooth transitions between pages.
Mobile app:
- Install the app and make sure it launches without any crashes.
- Navigate through the core screens and validate their responsiveness.
- Perform required interactions such as button clicks or form inputs.
- Verify functionality of key features such as push notifications or location services.
Database management system:
- Connect to the database and validate successful connection establishment.
- Execute simple queries and ensure accurate and timely results.
- Perform basic CRUD operations (Create, Read, Update, Delete) and verify data integrity.
- Validate the behavior of database triggers or stored procedures.
Conclusion:
Smoke testing is an invaluable technique for verifying the stability of construction by quickly identifying critical issues. By including smoke testing in your software testing process, you can ensure that the core functionalities of your application or system are robust and reliable.
Use the steps and examples in this tutorial to master smoke testing and increase the quality of your software releases.


Post a Comment